Complete Video Tutorial:
Text Version:
To create a neomorphic design, the color of the button must be the same as the background. Then we add a shadow of slightly darker color in the bottom right direction. And a shadow of slightly lighter color in the top left direction.And when we press the button, we are going to switch the shadow colors. That means the lighter color comes down and the darker one goes up.

Now, since we can only set the shadow in one direction. So, add one more button under it, and set its layout to full rect. Now, I will use the button in the behind to show the lighter shadow and Button on the front to show the darker shadow.
Now select the first button.

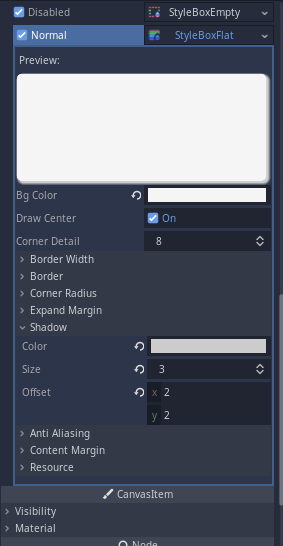
And inside it, first set the button color to transparent. Because we are only going to use this button for shadow. Now to make edges smooth, I will set the corner radius to 5 in all directions.
Then coming to shadows, first we are going to set the shadows color to white.
Now, size determines the blur amount and for me, 3 works best.
Then for the offset we will set it to -2 in x and y.
And now you can see the shadow in the top left direction.

Now for pressed style, most of the settings are going to be the same. So, I will paste these settings here as well and then I will make this style unique. Now here, we just have to change the shadow color to a darker color. So, I will write 200 in R, G and B values.
Now for focus and Disable style, just set these to StyleBoxEmpty and that's it for the background button.

Now select the foreground button.
And again, most of the style is going to be the same. So, I will just paste the settings from the background button. Now first, set the button color the same as the background color. and for the shadow color we are going to set the darker one.
So, I will write 200 in R, G and B. And for the offset, this time it will be positive 2 in X and Y.
Now again we will just copy these settings and paste it in both Hover and pressed style as well and make the pressed Style unique to make some changes.
And inside this, we first set the shadow color to complete white. And then we will also set the button color to a little darker shade from our background
So, I will put 225 in all R, G and B values. And finally similar to background button, we will again set Style Box empty for Focused and Disable Style.
Now, you just have to make sure that the mouse filter is set to pass.

So, the button which we use for the background will also get clicked. And we are done with the button. You can now use this button in any of your scenes.

Now there is just one problem with this button. You see, in your scene, when you write some text to the button. It will not show. Because you are actually writing this text on the background button. So, to solve this. Come to your button scene and assign a script to it.
And in the ready function, simply set the text of the foreground button from the background button.

Although, you will not see the text in the godot editor. But when you play the game, The text will be set to the foreground button, and you can adjust the button size while keeping the game window open.

.
Comments
Post a Comment